Category Archives: Recycling

Alice in Wonderland

Standard
Alice in Wonderland

P1000377

I have been wanting to create ‘Alice’ for a while now.  I felt this doll (once made-under and repainted) had just the right look.  Then I had to figure out how to make the dress and shoes.

I’m no seamstress so it was more a case of ‘work it out as I go’.  I had some old lace that had been hanging around for a while that I thought would go just right for Alice’s apron.

The shoes are always my biggest nightmare but having cut down an old pair of Bratz high heels I then sculpted with paper clay and Modpodge to create these little Mary-janes which don’t look too bad (hopefully with practice they will get better).

She is now in my Etsy store and hopefully an Alice in Wonderland fan out there will want her for sitting on a shelf (or for playing with)!


Oogoo and Molding for dolls shoes

Standard
Oogoo and Molding for dolls shoes

Since starting my journey of repainting Bratz dolls I have come across a problem that many other doll make-under artists have found…. what to do about shoes!  The ones they come with generally have really high heels and just don’t go with the whole make-under, more childlike tone we are aiming for, so this leaves a few options:

  1. look online to buy secondhand Bratz shoes which you can sometimes buy in bulk (although usually there will be a combination of high heels and maybe one or two pairs of sneakers/flip-flops thrown in). This can also work out a bit expensive when you are trying to keep the whole upcycling costs down.
  2. You can do a conversion job on the high heel Bratz dolls – there are various tutorials out there and some makers have done an amazing job.  I particularly like some of the boots I have seen out there and spent almost an entire Saturday with cardboard, felt and glue trying to make my own version.  Needless to say, I was not very happy with the end result and don’t think, with the amount of time it took, that it is cost effective for me.  Here is the result by the way (this doll is still going through ‘transition’ at the moment as I am going to try and dye the pink hair if I can):

    Bratz doll with home-made 'conversion' boots

    Bratz doll with home-made ‘conversion’ boots

  3. Make boots out of ‘oogoo’ which is a mixture of silicone caulk that you would use around the bath or shower and an equal amount of corn flour and some acrylic paint for colour.  I have tried this a few times with varying amounts of success.  As you will see in the picture – the doll on the right has the original oogoo boots I made and they are pretty ugly.  The doll on the left is how they looked after I had carved them down with a crafting knife (a little better I think):

    Original oogoo boots

    Original oogoo boots

  4. My latest option which I am in the process of doing so not sure whether it will be a success or not is making a silicon mold which I will then use to fill up with hot glue and hopefully then be able to paint. The first mold I made with oogoo ie; the silcone mixed with corn flour I tried late at night after covering the feet I was taking the mold from with petroleum jelly, pushing the oogoo right into the hole where the legs attach to the feet and then went to bed.  I got up the next day full of excitement only to find that as I pulled the the shoe out of the mold the delicate bit inside the foot just broke off and I was back to square one!

So now after further, extensive research, I have made molds out of pure silicone and am hoping (and praying) that when I pull these off in a couple of hours time, I shall be triumphant at last and will be able to cast my own little flat Bratz shoes (please keep everything crossed for me)! Its hard to believe that something so small can cause so much pain.

Silicone mold for Bratz shoes

Silicone mold for Bratz shoes

On a more positive note I have spent a little bit of time this week on trying to improve my photography as it is so essential to any kind of online selling so here is a little before and after picture of the latest dolls:

Before and after dolls

Before and after dolls

Some boho chic for my Gum Leaf Girls

Standard
Some boho chic for my Gum Leaf Girls

P1000092

Give me some pretty cotton and some lace scraps and I can’t help but want to make some summer dresses for my Gum Leaf Dolls (more of which here).  Of course I was working into the wee hours and had Dexter re-runs on for company (not exactly the best tv to go to bed on).

I wanted to show you the little jackets I made from the recycled items of woollen clothes I bought from the op shop (about 3 years ago now).

P1000091

I was very happy with the result – the lovely trims I bought last Saturday at the girls’ day out we had to Gail B’s sale (just wish I’d bought more in different colours now but I was trying to be good)!

Enjoy the fashion show:-P1000087P1000088

P1000089

Gum Leaf Dolls and the Tree Change Zeitgeist

Standard

2015-07-02 15.45.46

Say ‘hi’ to my Gum Leaf Dolls – the obsession which has kept me busy into the wee small hours since losing my day job a few weeks ago.

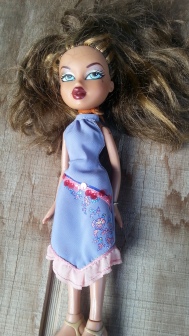
For anyone who hasn’t heard (and I believe there may still be a few out there) a new phenomenon hit the airwaves earlier this year … Tree Change Dolls by Sonia Singh an artist and mother of little girls living in Tasmania. She started removing the face paint from discarded Bratz dolls – a bit like this one:
2015-06-15 13.02.25

As well as removing the face paint, she would also work on restoring and untangling the hair (which believe me is no mean feat, it takes me over an hour usually to get all the knots and tangles out).

This is how they look at this stage:

2015-06-14 17.29.50

Now it’s a blank canvas and for me the fun part of painting on new features and seeing a new personality emerge. I like seeing the transformation into a more natural child-like look of dolls who enjoy playing in the outside world, climbing trees and camping.  A world that seems to becoming less and less accessible to children today and like Sonia I feel it is about creating the kind of doll I would have loved playing with myself as a child.

2015-07-02 15.35.38

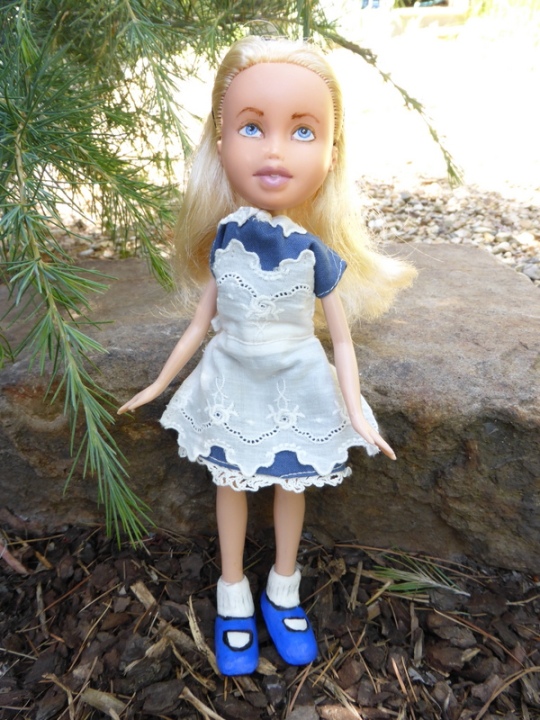
This is the ‘after’ photo of the Bratz doll above

Sonia has been generous with her knowledge and has a number of Youtube videos that help others do what she does and a quick look on Etsy will show how many are having a go themselves. I think as so many are wanting Sonia’s dolls and they sell out within seconds, there is no problem in others jumping on the proverbial band-wagon as each artist has their own unique style.

So far, so good but what a shock I got when I started reading some of the reactions on Tumblr as well as other internet haunts to the Tree Change explosion. It never occurred to me that some could get so incensed and inflamed about, what to me, was a fairly innocent and harmless hobby. There are those however, who are vehemently opposed and see them as an abomination and the ruining of a perfectly good doll.  Not only that but they seem to see it as some kind of political statement.  I can only say that from my own point of view, it is not about making a political point but just taking a toy that has been discarded, cleaning it up and giving it a new look and a new lease of life.  If you like your Bratz dolls to look as they did when they left the factory, absolutely fine – keep them that way.  If you prefer the Tree Change look, surely that’s fine too – each to their own, live and let live etc. etc. and really I think there are far more pressing issues in the world to get worked up about. Let me know where you stand on the issue and in the meantime here are a few more before and after pics.

2015-06-15 13.02.072015-07-02 15.37.50

2015-06-20 14.50.592015-07-02 14.21.09

Holly’s Chair

Standard

About 10 years ago I was offered some rolls of upholstery fabric that were being thrown away by a furniture manufacturer. Of course I couldn’t let this perfectly good fabric go to the dump so I gave it a good home! Unfortunately, it pretty much sat there in my roof space ever since. Apart from some shopping bags I made, I still had several rolls left. Then one day a couple of months ago I was talking to a friend who told me about her daughter upholstering an old chair, I immediately saw an opportunity for the remaining rolls of fabric to go to a good home. So without further ado I whistled them round to her house that evening. The one proviso was: that I could see some photos of the finished chair.

Well, I got an email a couple of days ago with some before and after shots and I think you’ll agree its a pretty impressive job.

Holly is in year 12 and this project is for her Visual Communications VCE where she had to create a design brief by a client then develop and produce the design. The chair took her about 6 weeks in all.

One sad looking chair …before


Another ‘before’ shot


Stripped right back, resprung and stuffed


After!


Holly’s Chair in all its glory!


Well done Holly, you’re obviously very talented and creative. I hope you get a really good mark for all your hard work. Thanks for sharing.

A thrifty find

Standard

I had another trip to the op shop this week (couldn’t resist) and my trusty spotter Sharyn picked out some more great woollen bargains. Two of these bargains have now become part of my wardrobe as they refused to shrink sufficiently. They are mens sweaters but that’s ok – they are big and warm and snuggly and obviously not a high enough wool content as they didn’t shrink a great deal even after a really hot wash and being put in the dryer for half an hour.

The other find of the day were the table-cloth and napkins below which I just had to have. The napkins (at a mere 50c each) – I will use the next time we have people over for dinner – nicer than paper ones I think and quite pretty with their little embroidered flowers in each corner.

I really like the table-cloth with its embroidered flowers and can’t quite decide whether to keep it as is or make something out of it… and herein lies a dilemma. Whilst browsing through various images of recycled table cloths for ideas, I came across this website that raised passionate arguments for and against the recycling of others’ handiwork. I had no idea what a contentious issue I was walking into!! and you can see it here:

My own personal view is: it has to be better to rescue an item that has been discarded and re-imagine it so that it can once again be admired by others. The alternative being to bury it in the back of a cupboard somewhere, never to see the light of day again. I could understand a bit of moral outrage if it were the Bayeux tapestry being cut into little squares but honestly I think most creators of handmade items would be flattered at the thought that their embroidered tablecloth was being treasured in a new guise 30 or 40 years later… I know I would. Anyway, I will let you make your own mind up and would love to hear your opinion and any suggestions for the tablecloth.

6 embroidered napkins….50c each!


Detail from the table-cloth

Recycle Update

Standard

As I posted a few days ago – I had a successful visit to the local op shop last week and bought some end of season woollens for half price in the hope of making a few ‘conversions’.

Op shop bargains

Well I did the really hot wash and everything shrank a bit – not having a tumble dryer I couldn’t do that step which I think would give everything a more felted appearance. I carried on regardless and this is what I came up with:

The pinky-brown one was from a child’s sweater so the hat is a little on the small side. This means I need to either find a little girl to give it to or a small-headed adult! It really was just a case of cutting the sweater straight accross under the sleeves, turning inside out, joining up as it was a cardigan and then a gathering stitch around the top, pull tight, tie it off then turn it out the right way again. I decided to put a little crochet flower on the side (which I had to look up on youtube). You can find it here:

The gold-coloured hat was even easier as I simply cut the ribbing off the tank-top (are they still called that?!), turned inside out, gathered the top and turned right side out again. It fits really well too!

Next I thought I would use the bigger charcoal sweater to see if I could make a reasonable cushion cover and I’m actually quite happy with it. Here it is:

recycled cushion cover

Again I just cut straight accross under the arms, turned inside out so I could sew accross the cut seam, turned back the right way and used some bright coloured wool to do the lazy daisy stitches and back stitch for the flowers. I used the little plastic snaps for closure at the bottom (have had them for donkey’s years and always knew I would need them one day – so good when you prove yourself right)!

I am now itching to go back to the op shops in the area and hunt out some more woollen sweaters – I think I’ve got the recycling bug!